Crafting Techniques: How to Make a Shaker Card


Whether celebrating a birthday, attending a baby shower, or just thinking about a friend, nothing shows you care, like a card and personal note. A handmade card shows the recipient that you took the time and effort to create something just for them.
There are many crafting techniques you can use to make a personalized card, but one of the most playful options is the DIY shaker card.

Crafting Technique: Shaker Cards
Shaker cards include a clear window filled with a small portion of embellishments, gems, confetti, or punched or die-cut shapes (like the hearts in the card above.) These cards amp up the fun and are oh-so-easy to create. There are a couple of different approaches you can use to create a shaker card, so let’s go over the supplies you’ll need to try out this new crafting technique.
Shaker Card Must-Haves
You’ll need a few specific supplies to add to your basic paper crafting supplies to make a shaker card. These include:
Shaker Card Embellishments
Get creative. Think outside the box. This is where your creativity comes in. Here are a few ideas for embellishments you can add to your shaker cards!
- Tiny Bee Trinkets
- Loose Gold Sequins
- Loose Shaker Elements
- Loose Frosted Dots
- Birthday Celebration Dies

How To Make A Shaker Card
Shaker cards may look fancy, but they’re pretty simple to make. You can use two basic techniques to create a DIY shaker card. One utilizes a clear envelope to contain the card front and embellishments, and the other uses clear window sheets with foam adhesive. Let’s break down each crafting technique so you can turn your next card into a celebration.
Clear Envelope Shaker Card
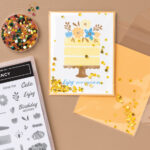
By using clear envelopes, DIY shaker cards are as simple as creating a card front, inserting it into a clear envelope, and adding embellishments.

In the example above, the card front is created using the Cake Fancy Photopolymer Stamp Set. From there, the art is added to a Clear Medium Envelope, and then shaker bits (in this case, Loose Frosted Dots) are added before the envelope is sealed. From there, the clear envelope is attached to a card base using Tear & Tape Adhesive or glue. And that’s it! With a couple of easy steps, you’ve added a little joy to a homemade card.
Check out our Instagram Reel to watch this crafting technique in action!
Window Sheet Shaker Card
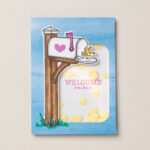
If you’re looking for a slightly more advanced option for making shaker cards, the window sheet method is a good way to go.

In this crafting technique, you will use dies to cut your window and then attach a clear Window Sheet with Foam Adhesive strips before filling it with shaker bits, like in the card shown above.
First, use a die to cut the shaker and the arch. Next, use stamps and ink to add decorative details. When everything is set, attach the Window Sheet with the adhesive of your choice and then line the window with Foam Adhesive Strips. Fill the window with shaker bits, remove the backing on the adhesive strips, and attach the backing to close the shaker and recreate the magic of a snow globe!
You can watch this process step-by-step here:
… your full embed content here …
Get the Party Started!
If you’re ready to shake up your card-making techniques and need a few more tips on how to make a shaker card, we have a passionate community of crafters who are ready to help. Reach out to a Stampin’ Up! demonstrator today.