Crafting Techniques: How to Use Stamp Blocks to Craft


Stamp blocks have several unexpected uses in the crafting world. Can you think of one that might surprise you?
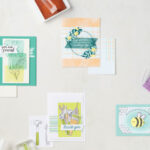
Our acrylic and transparent stamp blocks are a fantastic resource for upping the ante on your creativity and fun in paper crafts and beyond! Check out these unique crafting techniques and stamp block tips from Stampin’ Up!
Crafting Technique: How to Stamp with a Stamp Block
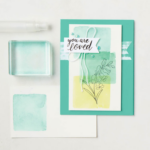
Believe it or not, a stamp block can occasionally stand in for a stamp! These beautifully abstract background shapes were created using little more than the block itself, a bit of ink, and a spritz of water, but the effect is dimensional and interesting, bringing plenty of color and natural beauty to the handmade card.

How To Stamp with a Stamp Block:
1. Ink the block by pressing it directly into your ink pad.
2. Spritz lightly with water for a captivating watercolor effect.
3. Press the block directly to your paper and pull it straight up.
4. Wipe the block on a stamp cleaner or with a paper towel and repeat with the same or different colors of ink.

Crafting Technique: How to Create Patterns with Stamp Blocks
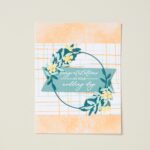
Creating patterns with a stamp block is another easy way to customize plain cardstock and express your personal style and creativity in paper crafting. Inking with clear blocks makes it even easier to position your makeshift stamp exactly where you want it, avoiding frustrating mistakes as you design cards, scrapbook layouts, party banners, and more.

How To Use a Stamp Block to Create Patterns:
1. Find a stamp block of your preferred length and turn it on its side.
2. Press it onto an ink pad to saturate with color.
3. Press the block to your paper in your desired pattern or shape (think plaids, stripes, shape and letter outlines, etc.), returning to the ink each time for best results.
4. Wipe the block clean each time you switch colors.

Crafting Technique: How to Create Two-Step Images with Stamp Blocks
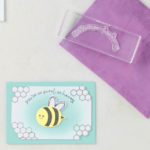
Stampin’ Up! clear blocks are perfect for using with stamps that build on each other to create fully colored images without needing to bust out the markers or colored pencils. Being able to see through the clear acrylic makes it easy to position each stamp in the set so you end up with a clean and professional image every time.

How To Create Two-Step Stamped Images:
1. Pick out your Two-Step photopolymer stamp set from Stampin’ Up!
2. Apply the first stage of the cling stamp set to your clear stamping block, ink, and press to paper. (Some prefer to stamp the outline first, others prefer to stamp the filler first. Try both and see which you prefer!))
3. Clean and remove the first stamp and replace it with the second step stamp on your transparent acrylic block.
4. Ink, press to paper, and clean!

Crafting Technique: How to Bend Stamps Using a Stamp Block
The unique sticking power of photopolymer stamps combined with the high-quality acrylic surface of Stampin’ Up! clear blocks makes for a perfect playground for customizing sentiments and other longer stamps. Even though the saying on this sweet DIY card was made to be straight, this block technique for card making allows for a tailor-made design unlike any other.

How To Create a Curved Image Using a Stamp Block:
1. Choose your stamp from longer, thinner designs for best results. Sentiments and borders work great!
2. As you apply the photopolymer stamp to your clear block, gently bend it to fit your design.
3. Test the shape visually before stamping on your product by making a few practice stamped images on grid paper.
4. When you’re satisfied, ink and stamp!

Learn More About Stamp Blocks from a Stampin’ Up! Demonstrator!
Inking with clear blocks from Stampin’ Up! is yet another way to get the most out of your crafting supplies. Learn even more about our favorite crafting techniques from a Stampin’ Up! demonstrator today!