The Embossing Folder Sandwich: Everything You Need to Know
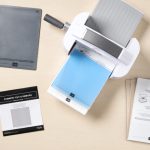


Are you ready to take your paper crafting to the next level? Then it’s time for the Stampin’ Cut & Emboss Machine to enter the picture. This tool allows you to use the paper of your choice and create your own die cuts and textured papers to elevate your designs.
Making custom creations with the machine is easy once you learn the basics, like how to use an embossing folder—a plastic folder with raised designs you run through the Stampin’ Cut & Emboss Machine to create a textured, dimensional effect on a piece of paper.
We’ll walk you through how to use the embossing machine, and after mastering a few basic techniques, you’ll be able to use embossing folders to add texture and a quick wow factor to your projects.

Understanding Your Plates and Accessories
Before you put the Stampin’ Cut & Emboss Machine to work, it’s important to familiarize yourself with its parts and how it works.
Each machine comes with a base plate, two clear cutting plates, a die plate, and a specialty plate. Layering the plates creates the pressure needed to die cut your image or emboss the paper. We call these combinations of layers a “sandwich.” The plates are numbered, so it’s easy to know which ones you need for your sandwich.
You’ll find the 6” wide platform can accommodate larger dies and full-size embossing folders, which comes in handy for projects of all sizes, since embossing folders come in multiple sizes ranging from mini (3 ⅜” x 6 ¼”), standard (4 ½” x 6 ¼”), square (6” x 6 ¼”), and large (6” x 8 ½”).

Standard embossing folders create a crisp impression. 3D embossing folders create deeper, more detailed textures that have three “levels” of embossing. Finally, hybrid embossing folders are designed for use with dies, allowing you to cut and emboss at the same time.
There are so many embossing techniques you can implement in your paper craft projects to make them unique and add interest.
Using Embossing Folders
It’s easy to learn how to use the Stampin’ Cut & Emboss Machine. Once you’ve selected your paper, you can choose which type of embossing folder best suits your project and begin.
Standard Embossing Folder Sandwich
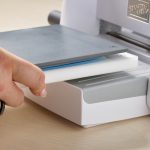
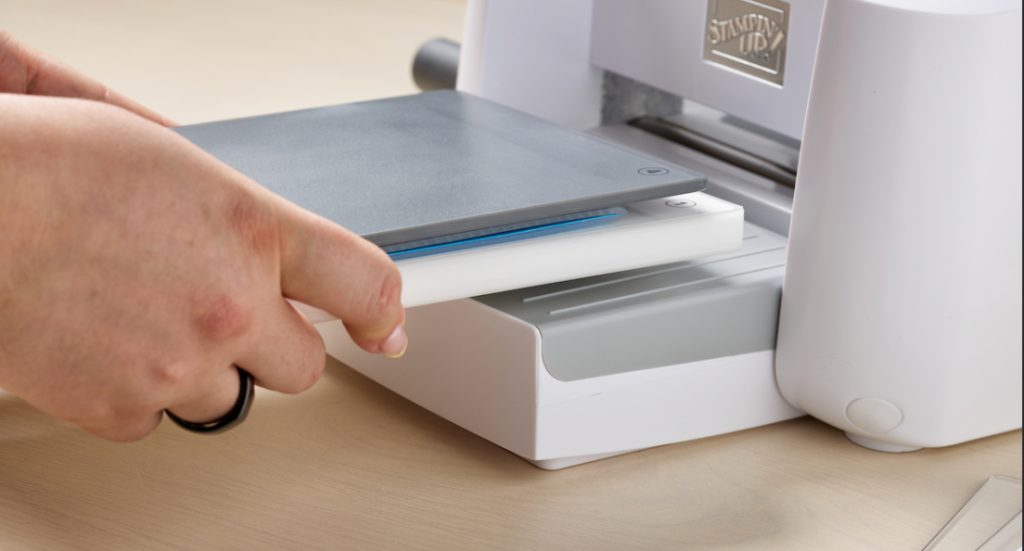
A standard embossing folder sandwich uses, you guessed it, a standard embossing folder. This folder is designed to create crisp impressions on the paper of your choice. Here’s how you build your sandwich:
- Layer 1: Base Plate (#1)
- Layer 2: Cutting Plate (#3)
- Layer 3: Embossing Folder with paper inside, placed so the hinge side will pass through the machine first
- Layer 4: Second Cutting Plate (#3)
That’s it! Next, you place your assembled sandwich on the platform and turn the crank to feed it through the machine. Once it has been fed through completely, disassemble the sandwich and admire your handiwork.
3D Embossing Folder Sandwich
The 3D embossing folder sandwich is built a little differently. Here’s what it looks like:
- Layer 1: Base Plate (#1)
- Layer 2: Embossing Folder with paper inside, placed so the hinge side will pass through the machine first
- Layer 3: 3D Embossing Plate (#4)
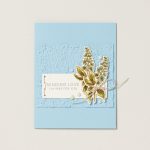
Don’t let the fewer layers of this sandwich fool you. The 3D embossing folder has a third level of impression that adds more detail to your project. You can see it here in the Beautiful Pattern 3D Embossing Folder.

The embossing folder and paper type you use, as well as where you place the paper in the folder, can all affect the final product and make it unique. For best results, always remember to build your sandwich so the hinge side passes through the machine first. And if you find you’re not getting deep enough impressions, try spritzing your paper lightly with water. This loosens up the fibers and makes them more pliable.
Feel free to experiment and test out a variety of papers. The thickness of the paper will change your embossing results. Try specialty paper, cardstock, Two-tone Cardstock, and even Designer Series Paper to get a totally different look.

Embossing Folders Give Your Projects Dimension
It’s time you added next-level designs to your paper crafting. Get the Stampin’ Cut & Emboss Machine and start creating embossing folder sandwiches of your own. You’ll love how easy it is to add a little extra flair to your projects with the standard and 3D embossing folders. The numbered plates make the step-by-step layering system foolproof, so the whole experience is fun.
Reach out to a Stampin’ Up! Demonstrator, or purchase the Stampin’ Cut & Emboss machine here.