DIY Greeting Cards: Personal Touches That Make a Big Impact

Homemade greeting cards are the cherry on top of caring for your people. Whether you’re celebrating a new baby, marking the end of an era, or simply letting someone know you’re grateful they exist, nothing does the job quite like a custom DIY greeting card.
Not only do you get to enjoy the creative process and perfectly customize the design and message, but that extra bit of effort goes a long way in creating meaningful connections with the ones you love.
And thankfully, Stampin’ Up! has everything you need to get started!
Selecting Materials for Your Homemade Greeting Cards
Selecting quality materials for your homemade greeting cards is the foundation on which you can create projects you love and help you enjoy the process along the way. Your tools and supplies should never stand in your way—rather, they should enable you to create with ease and set you well on your way to a whole lot of fun!

Choosing the Right Cardstock and Paper
Choosing the right cardstock is especially important to the success of your paper crafting, particularly homemade greeting cards. Cardstock is reasonably thicker than printer paper to lend structure and form to the card but not so thick that it won’t fold nicely. Cardstock comes in almost any color under the sun (look for coordinating hues to match your favorite ink colors and patterned papers at Stampin’ Up!) as well as in different textures. You can opt for smooth or ribbed or a linen finish to add subtle dimension to your handmade card, too! Our Stampin’ Up! cardstock is smooth, giving you the perfect surface to stamp and embellish.
Adding patterned paper to your greeting cards is often where the fun really begins. Bring pretty florals, cute woodland animals, or graphic patterns to the party (birthday, Christmas, barbecue!) or mood (celebratory, somber, sweet!).

Tools and Accessories
Essential tools and accessories for making homemade greeting cards include:
- A paper trimmer for cutting cardstock and patterned papers to size
- Permanent adhesive to secure paper and even 3D elements to your cards
- Stamps and ink or markers to help make your card’s message clear
Extras for increased customization and added flair include:
- Dimensional elements that add more personality or a little sparkle
- Punches, like the Terrific Toadstools Builder punch, to perfectly cut out your favorite stamped images

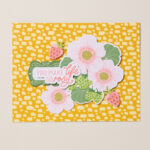
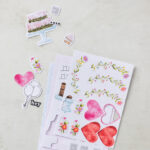
- Ephemera packs (we used the Something for Everything Mix & Match pack in the project pictured below) for convenient and coordinated cardmaking. All you need is some adhesive!

Finding Design Inspiration
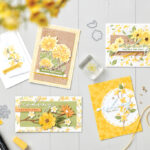
Lucky for everyone looking to make homemade greeting cards, inspiration is everywhere! Almost anything can prompt a beautiful color combination or card layout, so it’s nice to have one specific place you can turn to for guaranteed paper crafting creativity—the Stampin’ Up! Catalogs. Stampin’ Up! provides tons of new ideas for homemade greeting cards, scrapbook pages, gift tags, art for the home, and more—all tailored to the season and accompanied by the supplies you’ll need to get the job done in a fun and personalized way.
Check out the great ideas featured in our latest Stampin’ Up! Catalog.
Supplement Your Stamps
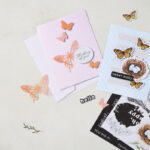
We can’t all own every stamp for every occasion (no matter how much we may want to!), so it’s smart to take advantage of pre-made ephemera, whether it comes in the form of imagery or sentiments. These darling DIY greeting cards were created using Mix & Match Ephemera Packs, including the Greetings For All pack. They’re quick to put together, and we love the layered look they create. You can even add some dimensional adhesives to really make those messages pop!

Fully Embrace a Theme
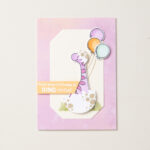
When you find a stamp set you love, utilize it to the fullest! Everything on this card comes from the Darling Dinos Bundle, from the birthday wishes to the special egg speckles to the darling dino himself. This makes for a fully immersive design experience—fun for the creator and a delight for the receiver!

Adding Unique Touches to Your Personal Greeting Cards
One of the best tips for creating homemade greeting cards is to make them totally personalized—after all, what’s the card for if not a meaningful connection? So, try incorporating something entirely unique to your loved one into the design of your next card—a ticket from a show you saw together, a snippet of fabric you know she loves, or a handwritten note about how much they mean to you. Any or all of this can be designed on the foundation of a coordinated product lineup to keep it cohesive and polished while letting the personal touches shine.
Designing and Assembling Your Greeting Card
When it comes to designing and assembling your greeting cards, it can be easy to break the process into a few simple steps.
- Start with an idea. Maybe it sounds obvious but your starting idea can be anything—a theme, design layout, or personalized item to incorporate.
- Create your base. Cardstock makes the perfect greeting card base. Just cut your paper into a 5.5” x 8.5” / 14 cm x 21.6 cm rectangle and fold it to create a standard A2-sized card.
- Add layers. Designer Series Papers, coordinated ephemera, ribbons, sparkles—attach it all with quality adhesive.
- Personalize it. Add those finishing touches, even if it’s just the message found inside, to make the card truly meaningful.
- Give it away! Make the most of your creativity by using it to let someone else know you care.
- Start all over again. This is the kind of thing that never gets old! Keep playing with new products, experimenting with more advanced designs and techniques, and finding more people to love on with Stampin’ Up!
Get More Advice and Ideas Today
Ready for more? Want to get ideas and advice from a paper crafting pro? Connect with a Stampin’ Up! demonstrator today—they can help you learn more of the creative techniques that go into making personal homemade greeting cards and more.