How to Emboss Paper


Embossing is the technique of creating raised designs on paper. It can add subtle texture or bold, glossy shine, depending on the method you use. Best of all—It’s a high-impact yet simple way to bring texture and depth to your paper projects. Whether you are making handmade cards, scrapbook layouts, or DIY decor, embossing takes your crafting to the next level.
In paper crafting, there are two main styles of embossing:
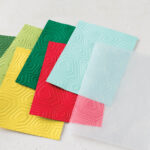
- Dry Embossing uses an embossing folder and a machine like the Stampin’ Cut & Emboss Machine to press raised designs into cardstock.
- Heat Embossing uses stamps, special ink, embossing powder, and a heat tool to create shiny, dimensional designs.
Both are beginner-friendly and can make your projects look polished and professional in just minutes.

How to Emboss: Essential Tools and Techniques
The supplies you need depend on which embossing method you choose. Here’s a quick guide to both styles.

Dry Embossing
Tools you’ll need:

Step 1: Choose your folder
Pick an embossing folder that matches your project.
- Hybrid folders let you emboss and die cut in one pass.
- 3D folders add rich, deep texture—perfect for cards or tags.
- Standard folders are quick, classic, and versatile for everyday papercrafting.

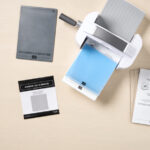
Step 2: Create the sandwich
Place your cardstock inside the folder, then layer it with the correct plates.

Not sure what plates to use? Follow the sandwich guide printed on your Stampin’ Cut & Emboss Machine or watch this quick video below:
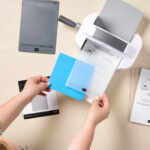
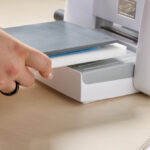
Step 3: Run it through
Crank the folder through your machine and peel it open to reveal the raised design.

Heat Embossing
Tools you’ll need:
Tip: The Stampin’ Up Additions Tool Kit has everything you need to make the process cleaner and easier. It includes the embossing buddy (to remove static/oils so that the powder only sticks to where it should), tweezers, a craft brush, and a tray to catch excess powder.
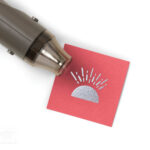
Step 1: Stamp your design
Choose a stamp that you love, mount it on the right-sized block, and gently tap into the Versamark ink. Press the stamp lightly and evenly onto your cardstock. (Don’t smush!)
Step 2: Add embossing powder
Place your stamped cardstock on a tray, sprinkle embossing powder generously over the design, and gently tap off the extra. Use a craft brush to remove stray flecks.
Step 3: Apply heat
Turn on your heat tool and hold it a few inches away from the paper. Slowly move it across the stamped image until the powder melts into a smooth, glossy finish.

Try Embossing Today
Embossing is one of the crafting techniques that gives you instant “wow” results. With just a few tools, you can add beautiful texture, shine, and dimension to your projects—no advanced skills required.
And for even more inspiration, check out the Stampin’ Up! Youtube channel for tutorials and step-by-step guides to help you craft with confidence. Want some hands-on help? A Stampin’ Up! demonstrator is the perfect person to help you emboss like a PRO. Reach out to one today!