Crafting Techniques: Using a Decorative Mask with Embossing Paste

Decorative masks are a fun way to expand your crafting technique because there are so many ways to use them! Whether you are making gift tags, cards, or art, these tools offer new avenues to explore your creativity. In this post, we will discuss how to mask using embossing paste.
Crafting Technique: Using a Decorative Mask with Embossing Paste
Decorative masks are stencils that crafters can use to add detail to their work. They can be used in conjunction with stamps and dies or on their own to create unique background designs. Stampin’ Up! offers a wide variety of decorative mask bundles that make your crafting possibilities endless.
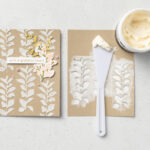
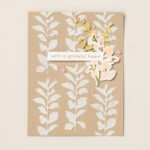
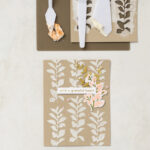
You can also make your own decorative mask using a die cut, as we did in the project pictured. This decorative mask was made using the Textured Floral Dies to create the repeating pattern shown below.
There are many different ways to use decorative masks in your crafting. Today, we are exploring mask tips using embossing paste. Using embossing paste with your decorative masks is a great way to add texture and artistry to your craft projects. For more ideas, check out our post, Using Decorative Masks with Ink.

How to Use Decorative Masks with Embossing Paste
It can be intimidating to try a new crafting technique. However, with a few tips and tricks, you’ll be ready to start exploring ways to use decorative masks with embossing paste.
Gather Your Supplies
To give yourself the best experience, gather everything you’ll need to get started. This could include:
Don’t Be Afraid to Get Messy
The creative process isn’t always neat and tidy. When it comes to DIY decorative masking, give yourself permission to play and experiment, whether you’re using this crafting technique for card making or background designs.
Once you have a project in mind, select the paper and decorative mask you’d like to use. From there, secure your mask (using a bit of tape) in your desired position. Using your palette knives, apply a generous amount of embossing paste. You can leave the embossing paste white or pre-mix it with some ink to add color to your design. When you are satisfied, gently remove the decorative mask. Set your craft aside and let it dry. You can also set it more quickly by using a Heat Tool.
Tidy Up
While your design is drying, take a couple minutes to tidy up. Use warm water to clean all of the paste from your decorative masks and palette knives. (Unless you’re using a paper mask, in that case it might be a one-time use unless you promptly scrape off the embossing paste.) If you wait too long to clean your tools, the embossing paste will set on them and make them harder to use in the future. Make sure everything is clean and dry before putting them away.

Start Creating With Stampin’ Up! Today!
All it takes is a little inspiration to get started. If you’d like to learn more crafting techniques or would like some ideas on precision masking crafts, you can connect with a Stampin’ Up! demonstrator today!