Crafting Techniques: Using a Decorative Mask with Ink


Masking and layering with ink is a fun way to personalize a paper craft. Whether you’re using precision masking to add detail to a favorite stamp or masking for background designs, this crafting technique can add depth to any crafting project. With a few easy tips for beginners and some basic supplies, you’ll be ready to start DIY decorative masking in no time!
Crafting Technique: Decorative Masks with Ink
Decorative masks, otherwise known as stencils, are an easy way to add color and detail to your crafting projects. At Stampin’ Up!, our decorative masks often come in bundles. You can use one mask alone to add a subtle accent to a project, or you can layer multiple masks in a bundle to create a rich design.
From playing with ink on different papers to creating detailed images, there are many approaches to decorative masking.

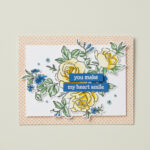
In this example, an image was stamped onto glitter paper. After that, the Enduring Beauty Decorative Masks (this product has been retired) were used to fill in the image with ink. In addition to adding color to a stamp quickly and easily, stamping on glitter paper is a unique way to make each color sparkle. You can see the step-by-step process in the video below.
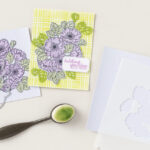
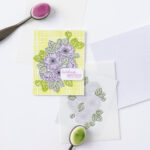
Masking and layering is also a simple way to add dimension to your stamp craft projects. For example, with the Layers of Beauty Bundle, you can use each mask to add a different shade or color to your stamp, resulting in an intricate image when the process is complete. See how in the video below.
How to Use Decorative Masks with Ink
When you’re first getting started with decorative masking, things can feel a bit intimidating. However, with some basic tools and a few masking tips, you’ll be ready to start experimenting with this crafting technique in no time!
Gather Your Supplies
As with any craft project, the first thing you’ll need to do when inking and masking is gather your supplies. Stampin’ Up! has a number of decorative mask bundles that you can choose from to get you started. In addition to the decorative mask of your choice, you may also need and want:
- Classic Stampin’ Pads in the color of your choice
- Blending Brushes
- Paper
- Stampin’ Seal (adhesive tape) or glue to secure materials as you assemble your project.

Set the Stage
Once you’ve gathered your materials, it’s time to set the stage. To make the masking technique as easy as possible, it may be a good idea to secure your base paper so that it won’t shift while you are masking and layering.
Each mask in a Stampin’ Up! decorative mask bundle comes numbered so you know which mask to start with if you are using them in a set. To get started, locate the mask labeled 1, or, if you are using a mask on its own, you can select any mask your heart desires.
Once you have selected your starting mask, line it up—either with the corresponding stamp or wherever you’d like to use it on your paper—and secure it with tape. It is also a good idea to mark the notch on the mask to properly align each subsequent mask, as shown in the video above.
Bring Your Image to Life
Now for the fun part! Ink your blender brush and start adding color to your design. Whether you’re using one color in various shades or a number of colors, it’s a good idea to start with your lightest ink and then layer darker colors on top.
Once you have finished applying ink to the mask you are working with, remove it, select the next one you would like to use, line the notch up with your marking, and then tape the new mask in place. From there, you can layer the same color for a darker shade or add a new color for some more pop. If you are using multiple colors on the same mask, you can cover each stencil with some paper to prevent unwanted color mixing.
After you have layered and inked all the masks you would like to use, the fun doesn’t stop. Whether you’re using dies to cut out your colored stamp or adding additional elements to complete the craft, there are a lot of ways to keep customizing your project.
Cleaning Up
Not only is DIY decorative masking an easy way to add color and dimension to your craft projects, but clean-up is also easy! Simply lay the mask down on a flat surface and gently wipe with a cleaning cloth or some dish soap if it’s really dirty. Make sure each mask is dry before storing.

Get Started with Decorative Masking
It’s always fun to add a new crafting technique to your creative toolbox. Whether you’re just getting started and are looking for more personalized tips or you’re an experienced crafter looking for more creative projects using decorative masks, we have a dedicated community that is ready to help. Reach out to a Stampin’ Up! demonstrator today!