Crafting Techniques: Creative Ways to Use Blending Brushes


A blending brush is one of our favorite ways to introduce new crafters to easy techniques that pack a big visual punch. You can use a blending brush to add subtle hints of color or create gradient colors for even more visual interest. No matter how you use this tool, it’s one of our favorite ways to increase the confidence and skill of crafters of every skill level.

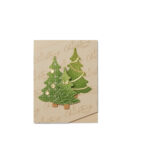
Crafting Technique: Gradient Christmas Trees with a Blending Brush
In this project, we used the blending brush to create a gradient on the Christmas tree and then layered it with other trees and embellishments.

The blending brush technique used here was a gradient—we used ink to create darker to lighter colors on the paper. With little effort, this added depth, dimension, and visual interest to the card. That’s why we love the blending brush: It can elevate a card without requiring significant skill—all you need is the right brush!
See how this project was created:
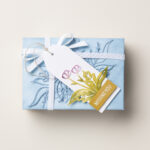
Crafting Technique: Natural Florals with a Blending Brush
For this project, we used a multi-colored gradient that added the real-life feel of the flowers and leaves.

By using multiple colors, we gave the card more depth and interest. Plus, adding various colors over the stencil allows for that natural, beautiful final look.
See how this project was created:
Tips for Using Blending Brushes
To achieve excellent results from your blending brush, there are a few steps you need to consider. Our first recommendation is to dab off the excess ink you might have on your brush on a scrap piece of paper or your grid paper before you use it on your project. This is not only to ensure you don’t get a darker hue than you were planning on, but it helps distribute the ink evenly on the brush.
Next, apply gentle pressure to see what kind of ink deposit you can get—the harder you push, the more ink you deposit, and the darker the color will be. If you are going for a gradient look, you could start with a lot of pressure, and as you move the brush across the paper, slowly release pressure. This will give you that gradient look we used for the Christmas tree project.

Additionally, if you want to blend multiple colors, you should use multiple brushes, as shown in the flower tag project. It’s easiest to have as many brushes as colors you will use; this helps the ink from all colors stay wet enough to blend with each other. If you had to wash out and wait for your brushes to dry before using another color, the ink colors may not blend well. Granted, there is almost certainly a project you might want that look, and in that case, one brush will get you the results you are looking for. Luckily, ours come in a set of three, and we also offer small brushes for blending with stencils or masks, if you want to concentrate color or work on small portions of your project.
Finally, make sure you clean and care for your brushes. We designed them to have velvety, soft bristles, which help them create that brushed-over, smooth look. If you don’t properly wash and dry these brushes, they could lose their delicate softness and functionality. The best way to clean blending brushes is with soap or Stampin’ Mist and water, and dry with the bristles down.
Blend Beautifully with Stampin’ Up!
Blending brushes are the perfect first step into more advanced paper crafting. You can create gorgeous, custom cards with relative ease using them, and we want you to feel the joy of successfully mastering a new technique!
We also want you to blend with us (pun intended!) and join our community of fellow paper crafting enthusiasts, regardless of your current crafting skill level. Crafting can create community, and our community is truly one of the most welcoming and supportive groups out there. Find your community on social media, or reach out to one of our demonstrators to get connected to other crafters!