Crafting Ink and Colors: Tips, Techniques, & Trends


Wassily Kandinsky is credited with saying, “Color is a power which directly influences the soul.”
Think about it—color is everywhere and certainly affects us in different ways. From how we dress in certain moods to the paint we choose for the rooms in our homes to the hues we use when crafting, color is a driving force in our lives. It sways emotion, and when we use crafting ink and colors, knowing exactly how to do so effectively, we can produce more creative results!
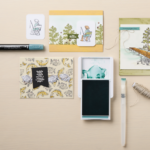
Crafting Inks: Understanding the Basics
Choosing the right crafting ink and colors starts with an understanding of how ink quality affects the outcome of your paper craft projects. So let’s get a few things straight up front: quality ink shouldn’t smudge after a few seconds of dry time, it shouldn’t contain high amounts of acid that will deteriorate paper and photos over time, and it shouldn’t noticeably fade over the years.

Next up, let’s talk about which type of ink application will work best for the project you’re imagining. For instance, an ink pad is a great tool for stamping, particularly if you want the image to appear in one simple color—perhaps an even outline you can choose to color in later.
But did you know that ink pads can be used to create custom backgrounds as well? By blending ink colors from pads with blending tools, you can produce beautiful ombres and images with softer, more free-flowing appearance. Ink pads and markers can both be perfect tools for adding distressed effects to your papercraft project as well!

High-quality markers with a felt tip are also a good choice for paper crafts, especially to produce outlined images of multiple colors (e.g., a bouquet of yellow flowers with green stems and leaves). Markers are also a great way to color in previously stamped images, create custom designs on ribbon and die cuts, write sentiments, or even produce watercolor effects on your paper.

So, which crafting ink do you use for your particular project? It depends on what you’re trying to achieve. But with a few more ideas about how to use the crafting ink and colors, you’ll be better able to create the unique effects you imagine on any given project.

Tips for Using Craft Inks
In order to get the best results with craft inks, here are some basic practices to keep in mind:
- Always cap your markers and ink pads properly to prevent drying.
- Store them flat to keep the tips inked.
- Experiment with new techniques and color combinations often to expand your creative capacity and avoid getting stuck in a color rut.
And now, here are some of those fun techniques to get your creative juices flowing!
Coloring Your Stamped Images with Markers
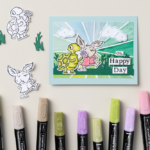
One of our favorite and certainly easiest tips for using ink for crafts is to take advantage of a black stamped outline with various colored alcohol markers. Essentially, you’re creating a coloring page for grownups—and who can resist that? Take this tip to another level by combining triadic and monochromatic techniques. (More on that below). Simply choose your trio of colors, but enhance it by going over a few details twice with the same color marker!

Use Markers to Stamp a Multi-Colored Image
Monochromatic stamping is lovely but if you want to add more visual interest and uniqueness to a stamp design, try using felt markers on a cling stamp to bring the image to life. You’ll need plenty of ink for a vivid impression, but you can play around with depth and color by varying the amount of ink or how long you let it dry on certain parts of the stamp before pressing it to paper. You can also breathe (some people use the term “huff”) onto the stamp to revive the color too. You’ll want to practice using the marker method to prevent a patchy image.

Design One-of-a-Kind Paper Patterns
A super fun way to make unique papercraft creations is to use stamps to design your own custom paper patterns. You could employ any color theory strategy here depending on whether you wanted your design to pop or provide a sure foundation for other elements of your creation.

Crafting Projects that Pop with Ink & Color
Looking for more inspiration on how to make your paper craft creations sing with gorgeous color combinations and clever use of crafting ink? Try basing your next design on one of these innovative projects.

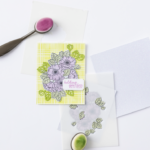
Blend white embossing paste with a bit of color using our Stampin’ Ink refill to create a colorful paste that you can add to cardstock to create a textured background for your handcrafted card.

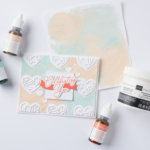
Use alcohol markers to color in the detail on a patterned paper. In the design above, we used a sheet of paper from the Nature’s Sweetness Designer Series Paper collection and added rich colors with Stampin’ Blends markers.

This large background stamp can do so much more when you stamp several colors and then cut them out to assemble a multi-color jungle that makes this thank you card pop.

Use markers to add individual detail to multiples. In this case, a delightful box of donuts starts by stamping out donuts from the Ice Cream Swirl Stamp Set using our Pecan Pie Classic Stamp Pad and adding colorful details with markers.
The Role of Color Theory in Crafting
If you want to explore color theory in more depth, check out our Color Coordinating 101 post, but here are the highlights and some ideas about combining ink colors for paper crafting.
Basics of Color Theory
The color wheel lies at the center of color theory. While there are multiple representations of the wheel, this simplified version will help us illustrate some basic concepts stemming from its design and layout.

The wheel is arranged in a gradient, where colors share general areas of the wheel, transitioning from hue to hue, and eventually going round the circle to meet back up with the original color. The colors that form the principal triangle on the wheel are known as primary colors—red, yellow, and blue. They are our most base hues, which complement each other in a vibrant and basic way. Secondary colors form the inverted complementary triangle (orange, green, and purple), and tertiary colors are the remaining six “in-between” colors on the wheel.

Understanding those relationships allows your eye to pull from ready-made color matches and produce dynamic and eye-catching combinations. But there are even more ways to pair up colors using a few more simple color theory concepts.
Mixing & Matching Colors
One of the best ways to mix and match colors in crafting is to think in terms of monochromatic, analogous, complementary, and triadic combinations.
The easiest one of these is monochromatic. To employ this strategy, simply choose one color you love and then pair it with other hues and tints of that same color. It’s a matchy-matchy look that can appear anywhere from basic to regal, depending on how you style the project. But you’ll never have to wonder if the colors “go,” as they’re just varying levels of one color.

Next up is analogous color pairing, which lends a harmonious and cohesive look to your paper crafting. Find analogous colors by picking one hue on the color wheel and then combining it with its neighbor on either side, like this example that features green, blue, and purple!

Complementary colors are found by choosing colors directly across from each other on the color wheel. Because of their purposeful contrast, these combinations feel fun and bold. (Maybe that’s why the red and green of Christmas works so well!)

The last go-to strategy for finding the perfect color combinations in crafting is to use triadic color trios. These are the primary, secondary, and tertiary mixes mentioned above, which always lend a sense of well-balanced energy to a card, scrapbook page, or gift tag!
Expand Your Creativity by Crafting with Ink & Color
The beauty of bringing color into crafting with ink is that it opens up so many fun possibilities that add variety and excitement to your crafting process. Whether it’s with markers or ink pads, enjoy some experimental exercises and see where a focus on crafting ink and colors can take you!
Want to get in with a group of people who love and celebrate creation, quality crafts, and great deals like you? Join the Stampin’ Up! community by following us on Instagram for tons of inspiration, helpful techniques, and a heads-up on fabulous sales at Stampin’ Up! Contact a demonstrator today to learn more!
