A Beginner’s Guide to Using Alcohol Markers in Crafting
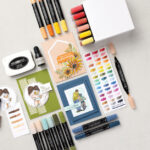

Graphic designers, artists, architects, and other professionals have been using alcohol markers for decades. So, it’s no surprise that they have a reputation for being the best crafting markers. It’s easy to see why paper crafters love alcohol markers—they are extremely versatile, have vibrant colors, apply smoothly, and blend like a dream. Now that alcohol markers are widely available, they’ve added a new dimension to all types of paper crafting.
What Are Alcohol Markers?
Alcohol markers are a type of marker known for producing vibrant colors, blending well, drying quickly, and providing long-lasting results for your paper crafts. There are many different markers to choose from, and while each type has its place, alcohol markers are the preferred tool for crafters to use for card making, scrapbooking, and DIY paper crafts because they are versatile and finish cleanly.

Why Alcohol Markers Matter In Crafting
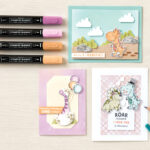
There are a lot of reasons to use alcohol markers for card making and other paper crafts. First, they dry extremely fast. This makes them easy to use as blending markers or layer colors without waiting a long time between applications. The alcohol base is also more colorfast than water-based and lends itself to a smooth, streak-free application. The result is a higher-quality, better-looking finished product. Finally, our alcohol markers are dual-tipped and offer broad and fine-tipped ends so they can be used for larger projects or detail work.
RELATED: Color Coordinating 101: Everything You Need To Know
Of course, as with most things, not all alcohol markers are created equal. The blending abilities and nib quality can be disappointing in lower-quality alcohol markers. It’s important to get high-quality crafting alcohol markers if you want the best results on your projects.
Choosing The Best Alcohol Markers For Crafting
It’s easy to find the best alcohol markers for crafting if you know what you’re looking for. There are three main things you want to consider when choosing alcohol crafting markers—color range, dual tips, and marker shape.
Color Range
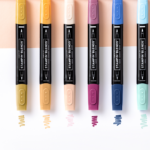
One of the great things about alcohol markers is the ability to blend them. High quality alcohol markers offer a wide color range to make blending easier. You can use the color options to create gradient drawings that give your artwork depth and really make it stand out.
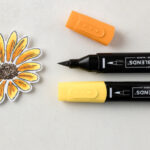
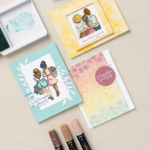
Hot Tip: The Stampin’ Up! alcohol markers coordinate with the Stampin’ Up! papers, inks, and colored pencils. Everything coordinates to create a cohesive project look. Our blends also come in a two-pack; you get a light and a dark version of the color, so you’re ready to go! (The flower below was colored using Daffodil Delight and Pumpkin Pie.)

Dual Tip
High-quality alcohol markers will have dual tips. One side will typically be a broader tip, while the other will be narrower for more detailed work. There are two main types of broad tips: brush tips and chisel tips. A brush tip is the most versatile of all the tips. It can create thin strokes or flatten them to fill large areas. The ability to create thin and thick lines also makes the flexible brush tips great for hand lettering and calligraphy. A firm chisel tip also allows you to create thin or thick lines, but it’s not as precise as a brush tip and requires a bit more finesse.
If one side of a dual-tipped alcohol marker is broad-tipped, the other is typically smaller. The two most common detailed tips are fine and bullet. A fine-tipped alcohol marker will look similar to a pen. While this is an excellent tool for fine detail work or writing, it isn’t practical for much else. The other option, a bullet tip, gets its name because it’s shaped like a bullet. The bullet tip is a good option for general details. It’s not great for fine details or large coloring areas, but it is a workhorse for all the in-between areas.

Marker Shape
This involves a bit of personal preference, but a high-quality alcohol marker should be easy to hold. A marker with a comfortable grip will make it easier to maneuver and do detailed work. So, find a marker that feels good in your hands to get the best end result.
Alcohol Marker Technique For Beginners
If you’re wondering how to use alcohol markers in crafts, we have a few tips to help you get started. First, it’s important to note that alcohol-based ink dries more quickly than water-based markers. You’ll also want to make sure you use high-quality paper to get the best results from your markers. As with any new tool or technique, there is a bit of a learning curve to using coloring and blending markers, so don’t be frustrated if it doesn’t look perfect on your first try. (A little tip is to place a scratch piece of paper under your coloring paper because markers can bleed through.) It’s important to practice so you can get the hang of it. Here are the most common things we recommend you focus on:

Basic Blending Technique
Before you start using your alcohol markers on your project, it’s best to use some scrap paper to practice seamless blending, layering colors, and smooth transitions. You’ll need two or more shades of the same color to achieve these looks. Start by laying down the lightest shade. Then, apply the darker color while the first color is still wet. Repeat this process with as many colors/shades as you’re using. Next, return with the lighter color and blend the area between the two. That’s all there is to it, but it does take practice to master the technique.

Creating Depth and Dimension
The blending abilities and variety of shades of alcohol markers make them ideal for creating depth and dimension in illustrations. Simple shading techniques and the use of color gradients can help give the illusion of depth. When creating depth, you want to be able to still see the difference in tones. Darker colors should be used in the shadow areas and lighter colors in the areas where light would hit.

Additional Blending Tips & Techniques
A slightly more advanced technique for blending alcohol markers is “flicking.” Flicking is the process of using quick, flicking motions to layer a darker color over a base color. It creates fine strokes that overlap with the original, lighter color. Some people prefer using this method to blend two or more colors.

Other techniques you can experiment with include stippling or feathering. Stippling uses fine dots or lines to build texture and depth. Feathering is a blending technique where the edges of the image are softened by using a lighter or darker shade. As with all the other methods mentioned, these techniques require practice but can really take your projects up a notch.
Here’s how to do the flicking, feathering, and stippling technique:

Color Your Crafting Projects with Stampin’ Blends Alcohol Markers
The bottom line when using alcohol markers for card making and crafting is not to be afraid to experiment. Stampin’ Blends dual tip alcohol markers come with brush and bullet tip ends for use on a variety of projects. They are available in a wide array of vibrant complimentary colors, and each package comes with a light and dark marker so that you can create the perfect blend every time. As a bonus, they are ergonomically easy to hold and use. Give alcohol markers a try on your next project and see what all the fuss is about.
Want to learn from a pro? Connect with a Stampin’ Up! demonstrator today for more advice and hands-on instruction on our line of premium alcohol markers.
