Crafting Technique: How to Make a Slider Card


A card is always a delightful surprise, but an interactive card brings an extra layer of fun for your loved ones! This card is a slider card, and we use a few different tools and techniques to achieve the final product. It may seem intimidating, but with the right tools and a little help from us, we think most crafters can easily create a slider card. The possibilities are endless with this technique. The charming sunshine card we made works beautifully for a slider card, but we love seeing your creativity and innovation, so share your final products with the Stampin’ Up! community using the hashtag #stampinup on Instagram!

Crafting Techniques: Slider Cards
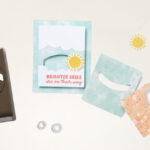
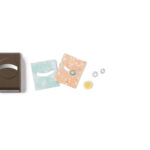
You can make a slider card with a few simple tools and supplies. You’ll need two pieces of paper, preferably sturdy cardstock, and a punch to make the “track.” Use one long enough for the item to move, like the Curved Label Punch we used here. You’ll also need two ¾” hardware washers, the item you want to have move (in this example, it’s the punch out of the sun), and two or three dimensionals. Make sure to have high quality glue on hand—you’ll use it in almost every step!
How To Make A Slider Card
Here are the steps to make a slider card. Trust us, it’s easier than it looks!
- Cut two pieces of paper (one cardstock for support, the other Designer Series Paper for pattern/design), approximately 3×4 inches. They need to be the same size to overlay each other and provide extra support for the card’s moving parts.
- Use the Curved Label Punch to punch a hole through each piece of cardstock. Take care to make sure the paper lines up perfectly so the punched shape aligns. It helps to measure the paper and make a mark where you want to punch.
- Glue both pieces of cardstock together, ensuring that the curved shape you punched lines up with each other.
- Place one washer under your paper with the center of the washer aligning with the opening you made with the hole punch.
- Add an adhesive dimensional on top of the washer, with the dimensional sticking out through the hole we made with the hole punch.
- Attach the other washer to the top of the bottom washer to connect through the hole you made.
- Using glue, attach the moving object (in our case, the sun) to the top of the washer.
- When the glue is dry, test out your slider—it should move easily through the punched hole.
- Attach the slider element to the front of your card base using a double layer of adhesive dimensionals so the cardstock pops off the base a bit, giving the slider room to move.
You’ve done it! You created a slider card that is truly unique and interactive. Imagine the joy and excitement your loved one will feel when they see this delightful card.

Learn More Today!
We’re so much more than just slider cards at Stampin’ Up! Our friendly community of demonstrators can show you more crafting techniques and offer advice about tools and projects. The best part? They are everywhere! Find a Stampin’ Up! demonstrator in your area today!