Crafting Techniques: How to Use a Die as a Stencil

Anyone who has used a die in their crafting knows what a great tool they are for creating clean and consistent paper cutouts for their projects. But did you know that dies can pull double duty and make stencils, too? This simple crafting technique of decorative die stenciling will help you create dynamic layering, bring extra color, and create completely unique designs for your handmade cards, scrapbook layouts, gift tags, banners, and more!

Crafting Technique: Using a Die as a Stencil
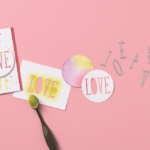
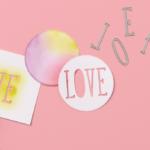
This sweet LOVE card shows the standard way of using a die and the bonus crafting technique of using the die as a stencil-creator. In the forefront, the negative space where dies have been used to cut out the word LOVE is filled in with a pretty inked gradient, making the letters pop. But in the background, you see a custom pattern created in complementary colors, giving us double the power of the dies and triple the love on the card!

How To Stencil Using a Die
Ready to learn how to stencil with dies? Follow these simple stenciling tips to get the best results with your custom craft projects.
1. Gather your supplies. Lay out the dies you want to use in your paper craft, along with your die cutting machine and plates and enough cardstock to leave a decent border around the edges of your die cut lines.
2. Cut your stencil. Run the dies through your machine and remove the cutouts, keeping track of any detail pieces you’ll need to complete the image (like flower centers or the insides of letters and numbers).
3. Arrange the die-cut stencil on your project. You can do this simply by positioning your cardstock stencil where you’d like, or—if your die is more intricate or requires those free-cut pieces to be placed back into the image—use a tiny bit of repositionable adhesive to keep your stencil in place.
4. Apply ink. Blending brushes or sponge daubers are the perfect tool for daubing ink from an ink pad onto your paper craft project through the cutout stencil, making sure to tap the cardstock with your blending brush or dauber rather than rub, which can result in moving or altering the DIY die-cut stencil.
5. Remove the stencil. Lifting straight up, remove the stencil from your craft project.
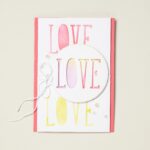
6. Reuse as desired. One of the cool things about creating personalized dies with cardstock is that they’re both reusable (think repeat patterns for custom papers) and disposable if you only need the image once! But look at how cool that yellow “LOVE” below is! You could easily find a way to use that.
Using this DIY stencil technique is a fun way to extend the power of your favorite paper crafting tools and supplies. Try it on your next card-making, scrapbooking, or home decor project!

Learn More Crafting Techniques Today!
Looking to level up on even more crafting techniques? Stampin’ Up! demonstrators are a great resource for makers of all experience levels! Contact one today to make the most of your crafting experience.