Using Die Cut Shapes to Make Your Paper Crafts POP

Why fuss around with scissors and precision blades, hoping for a clean cut when you could make the most of your creative experience using a die cutting machine? Learn how to create paper crafts that pop using die cuts that seamlessly coordinate with your favorite papers, stamps, and more from Stampin’ Up!
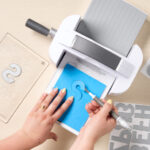
Understanding Die Cutting
Die cutting is the process of using a special machine to create flawlessly cut-out shapes from paper. Essentially mimicking a cookie cutter, a die-cutting tool uses gentle pressure applied to a thin metal shape by turning a rotating handle. You can choose your paper—whether plain or patterned, smooth or textured—and a manufactured die to produce your desired cutout.

These paper shapes can then be used to design dynamic and layered paper crafts, such as cards, scrapbook pages, gift tags, goodie boxes or bags, banners, and more. By coordinating these cutout shapes with your favorite stamps or Designer Series Papers, you can customize them to perfectly match your paper craft’s personality or theme, which is unmatched by other methods!

READ MORE: Die Cutting Demystified: Tips, Tricks, and Techniques
7 Ways to Use Die-Cut Shapes in Paper Crafts
Wondering just how useful a die-cutting machine will be for your own paper crafting projects? While the options for creating with custom die cuts are boundless, here are six clever ideas to give your own creative vision a headstart.
Add Some Playful Depth
The Snowy Delights dies and Snowy Delights Bundle combine to help you create delicate, intricate cuts and crafts that would be almost impossible with scissors alone!

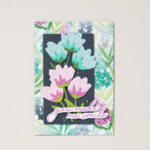
Use Tone-on-Tone Techniques
With dies designed for layering, you can easily employ tone-on-tone techniques to upgrade your papercraft designs. Pulling coordinating colors from the background paper, these flowers become an elevated focal point of the homemade card.

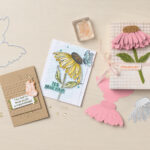
Mix & Match Die and Paper Types
Use cleverly perforated dies with plain and patterned paper to create a layered masterpiece. The framed artwork below includes lots of intricate cuts and details—layers of die cut patterned paper combined with thicker cardstock elements, along with embellishments like pearl dots and ribbon, come together into project full of cuts only made possible with the use of a die cut machine.

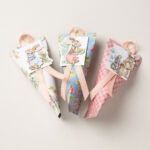
Create Unique Gifts
Some of our favorite and most versatile dies are designed to fold into envelopes, boxes, or bags. This means that, attached to even the simplest gesture, they can become vehicles for expressing how much you care. Use coordinating papers and ribbons to round out the packaging and its matching message.

Shake Things Up with a Window
A die-cut window with an acetate cover is a sweet way to offer an interactive window into your paper-crafted sentiments—especially when raised with dimensional adhesives and filled with a fun combination of embellishments. What better way to get the party started?

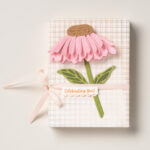
Add a Dimension of Realism
Level up your perfectly formed die-cut flower by gently curling the paper petals. This allows them to lift off the page and bring your papercraft to life. The whimsical realism this adds to the creation is matched by the two-tone stem, which is also made possible by this set of dies.

Make the Most of Your Designer Series Paper
Buying in a bundle pays off big time when you get to use every bit of your supply stack. Certain die sets, like this one from the Storybook Friends bundle, ensure every detail can be front and center on your designs. Simply use the coordinated dies to cut out certain parts of the paper without ever pulling out your scissors!

Make Your Paper Crafts Pop with Die Cut Shapes
Need a few more reasons to take your paper crafting to the next level with the Stampin’ Cut & Emboss Machine? Here are some great tips to make the most of your die cutter, even without a specific project in mind!
Have generic die cut shapes at the ready. Create your own ephemera packs by cutting out flowers, trees, hearts, pennants, frames, numbers, and sentiments from plain cardstock. Keep them in easy-to-sort envelopes, drawers, or even a photo album—this a great way to ensure you have all the elements you need to whip up a unique and beautiful card, party favor, or banner at the drop of a hat!

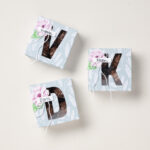
Add dimension to your already dimensional pieces. Using die cut shapes in your paper crafts can help them stand out, especially when you use the negative space to build your creation! Like these gift boxes below.

Use paper embossing techniques to lift your dies. Bump up the professional look of your cards by naturally lifting your dies off the page with the texture created from paper embossing. Simply run an embossing folder through your Stampin’ Cut & Emboss Machine with your background cardstock and watch the magic happen!

Contact a Stampin’ Up! Demonstrator
Want to learn even more about making your papercrafts pop with die cut shapes? Contact a Stampin’ Up! demonstrator for more information, follow us on Instagram for the freshest paper crafting ideas, or shop for your next die set here!