Die Cutting Demystified: Tips, Tricks, and Techniques


Using a die cutting machine is a game changer for paper crafting. Because it can make precise, intricate cuts so quickly and easily, one of the more painstaking tasks in scrapbooking and card making becomes a simple delight! Plus with the die cutting and embossing combo capability of the Stampin’ Cut & Emboss Machine, you’ll never run out of intricate and unique details to add to your paper crafts.
What is Die Cutting?
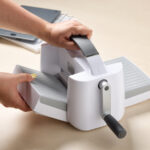
Die cutting is a process that involves using a die—a metal blade—to cut paper into specific shapes or designs. It’s similar to using a cookie cutter, but instead of cutting dough, the die slices through the material, making a clean, precise cut using pressure often applied by a machine.

In the case of the Stampin’ Cut & Emboss Machine and its mini counterpart, paper is layered between your die and a set of plastic plates that help the machine evenly apply pressure as you turn the crank, and the “sandwich” rolls across the machine’s platform.


The result is a perfectly cut paper shape every time! That can mean anything from extremely detailed lettering to the perfect outline for a stamped image and more!

How to Choose the Right Embossing Machine
Quality, quality, quality! When you’re choosing the best die cutting machine, you need something that’s going to produce great cuts and do so long-term. For us, that means opting for high standards in manufacturing and materials. Our Stampin’ Cut & Emboss Machine has an all-metal interior which ensures that the rollers maintain pressure with plenty of usage over the years, rather than loosening over time and failing to cut paper shapes cleanly.
Another thing to look for is ease of use. If you’re required to jump through hoops to produce a die-cut shape, you’ll likely wonder if it was worth the investment or if you should have just stuck with scissors or a precision blade. But when it’s as simple as layering and rolling, you’ll immediately recognize the payoff and continue looking for reasons to use such a high-quality crafting tool.

One more bonus quality to check for when purchasing your own die-cutting and embossing machine is portability and ease of storage. You don’t want an overly large machine that takes up too much space on your worktop, nor will you want one that is impossible to move from place to place. We love the Stampin’ Up die-cutter’s lightweight and portable qualities and foldable platform, making it a dream to travel with (hello, craft get-togethers!) or tuck away when not in use.

It even comes in a smaller size. The Mini Stampin’ Cut and Emboss Machine has a compact footprint for easy storage and travel. The 3-1/2″ (8.9 cm) platform works with many of Stampin’ Up!’s smaller dies and embossing folders.

Selecting Dies for Your Crafting Projects
Just like when selecting stamping for your crafting projects, you’ll want to choose the dies that will serve your needs best.

It’s a good idea to look for classic shapes you’ll use again and again (think flags, florals, frames) and some common sentiments (messages of love, birthday wishes, and congratulations are a great place to start). Then, as your confidence and creativity grow, you get to expand your collection of dies to whatever you dream up.

One incredibly satisfying way to choose your dies is by their coordination with stamp sets you adore. While plain, cut shapes are a great resource for creative paper crafting, stamped and perfectly die-cut elements elevate your cards and scrapbook layouts to a whole new level of personalized professionalism and fun! No more aching over accidental scissor slips or misshapen results—just your favorite stamps highlighted in a clean and polished way.

Simple Tips for Die Cutting
When done correctly, die cutting is super useful and satisfying for card making and scrapbooking. Here are some quick and easy tips for using a die-cutting machine to its fullest.
Cycle Through Die Cutting Plates
As you can imagine, the sharp metal dies will eventually make impressions in the hard plastic plates used to send your die and paper through the machine. If you start to see that any of these impressions are pressing grooves into your paper die, switch out the plate for a new one, putting the smoothest surface closest to your paper.

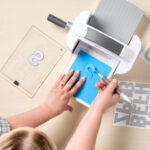
Use Repositionable Tape
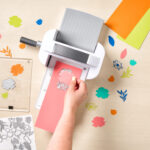
To prevent your die from shifting as it moves through the machine, gently secure it to your paper with repositionable tape (we used Masking Paper, which worked like a charm!) on the edges. The larger the die, the more tape you may want to use. A small piece of tape is all that is needed to secure this floral die to the paper in the correct position.

Once covered with a plate, you can safely roll the paper and die through the machine.

Carefully remove the taped die, and you’ve got precision-cut flowers!

Cut On an Angle
When cutting out a square or fairly large shape, turn your die at an angle rather than having a large flat side aligned with the plates. It helps the machine grab at the sandwiched plates and roll them through without slipping, which could result in uneven cuts.

Stamp First, Cut Second
If you’re using our stamp and die sets, make sure to stamp first and cut second. This way, you can perfectly align the die with your stamped image for a precisely bordered cutout every time.


Use a Pick
Detailed and delicately designed die cuts can be tricky to handle without the proper tools. Our multipurpose precision pick makes maneuvering everything from thin lettering to sequins a breeze. Plus, you can easily grab a part of your die cut’s design and slowly pull it away from the excess paper without the risk of fumbling or tearing.

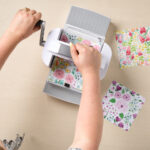
BONUS TIP: Expand the Use of Your Machine
Double the duty of your die-cutting machine by using embossing folders to add clean and detailed dimension to your creations. Simply place your paper between the folders and run through the machine normally, and voila, tons of texture and visual interest are created in just seconds!

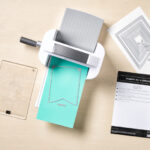
Below you can see that the blue cardstock is inside the embossing folder with the fold facing towards the machine, on top of plate number 1.

The gray embossing plate (plate number 4) is placed on top of the plate number 1-paper-embossing folder sandwich and will then pass through the Stampin’ Cut and Emboss Machine by using the hand crank.

The embossing folder will leave an impression on your cardstock without cutting the paper.

The Importance of High-Quality Materials and Products
Most often, the quality of a product is reflected in the quality of what it produces and for how long—you’re sure to find that holds true when choosing the best die-cutting machine. The Stampin’ Cut & Emboss Machine is a workhorse of a crafting tool designed to last while turning out consistently precise cuts with speed and efficiency! Developed specifically for Stampin’ Up!, this tool continues to be a favorite for beginning card makers and avid scrapbookers alike!
Level up your stamping and paper crafting game with your own die-cutting machine, or chat with a Stampin’ Up! demonstrator to learn more about everybody’s favorite crafting tool today!