How To Heat Emboss Paper


What is heat embossing, and why do crafters love it so much? Heat embossing is a simple yet stunning way to add texture, shine, and surprise to your paper projects. With just a few supplies, you can elevate handmade cards, stationery, and scrapbooking layouts into keepsakes that stand out.

If you’ve been curious about trying it out yourself, this beginner heat embossing tutorial will walk you through the basics, share helpful tips, and highlight a few common mistakes to avoid along the way.
How to Heat Emboss Paper
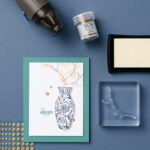
Before you start, gather the essential supplies:
Pro Tip: The Stampin’ Up Additions Tool Kit makes the process cleaner and easier. It includes the embossing buddy (to remove static/oils so that the powder only sticks to where it should), tweezers, a craft brush, and a tray to catch excess powder.
Basic Steps for Heat Embossing
Step 1: Prepare your stamping surface
Choose a stamp design that you love and mount it on the right-sized stamp block. Make sure your cardstock is free of any dust and oils by brushing it lightly with the embossing buddy.
Step 2: Stamp your image using Versamark
Gently tap your stamp into the Versamark ink pad. Versamark ink works great for embossing projects because it stays tacky for longer, giving you more time to sprinkle on your embossing powder. Take your stamp and firmly press it into the cardstock.
Step 3: Pour on embossing powder
Place the cardstock on your tray and generously sprinkle the embossing powder over the design.
Step 4: Shake off excess powder
Gently tap the cardstock to shake off the excess. Use a craft brush to remove stray flecks of powder surrounding the design.
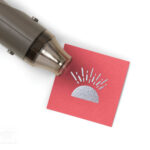
Step 5: Heat with embossing tool
Hold a heat tool a few inches away from the paper and move it slowly across the stamped image. Watch as the powder melts into a smooth, glossy finish—that’s the magic of heat embossing!
For a visual demonstration, check out our video, ‘Back to Basics with Heat Embossing.
Common Mistakes to Avoid
- When you stamp your image with VersaMark, press lightly and evenly (don’t smush) to keep the image crisp.
- Overheating the powder: too much heat can scorch the paper and damage your creation.
- Skipping surface prep: not prepping the surface may lead to powder sticking to places it shouldn’t.
- Rushing the process: not being thorough, going too fast, or moving the heat tool too quickly can all leave parts of your design unfinished and lacking detail.
FAQs about Heating Emboss Paper
Can you heat emboss without a tool?
A heat tool is required for heat embossing. Alternatives like hair dryers don’t get hot enough and may blow powder everywhere. If you’re looking for a heat-free embossing option, consider die embossing.
What type of paper is best for heat embossing?
Smooth, heavyweight cardstock is ideal. Thin paper may warp under heat.
What’s the difference between dry embossing and heat embossing?
Dry Embossing uses an embossing folder and a machine like the Stampin’ Cut & Emboss Machine to press raised texture into cardstock. Heat Embossing uses stamps, ink, embossing powder, and a heat tool to create shiny, dimensional designs.

How do you keep embossing powder from sticking everywhere?
Using our embossing buddy from our embossing additions tool kit is the perfect way to remove oil and static that powder sticks to.
Can you layer different colors of embossing powder?
Yes! Try adding one color at a time and heating in stages for a unique blend of colors and designs.
Is heat embossing permanent on paper?
Yes—once melted, embossing powder bonds to the cardstock and won’t rub off.

Make Your Projects Shine
Heat embossing may look like magic, but with just a few basic supplies and instructions, you’ll see just how easy, fun, and addictive it is. Whether you’re creating custom birthday cards, wedding invitations, or scrapbook pages, heat embossing takes your projects from beginner to expert in minutes!
Explore embossing powders, stamp supplies, and tool kits Stampin’ Up! offers to make crafting easy, fun, and beautiful. And for more tutorials, embossing techniques, and project ideas, be sure to check out the Stampin’ Up! YouTube channel.
Want to get some hands-on help with heat embossing from a pro? Reach out to the community of Stampin’ Up! demonstrators today to get help from a crafting expert.