How to Use a Crafting Brayer
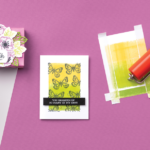


Whether you’re a seasoned crafter or just starting your creative journey, having the right tools can transform any papercraft project from something plain to something extraordinary. Today, we want to highlight a crafting essential, the Stampin’ Brayer. This handheld roller is a versatile tool that is useful for crafters of all skill levels.
HOW TO USE A CRAFTING BRAYER
Like most tools, the brayer tool provides depth and breadth to a crafter’s repertoire. From simple applications to advanced techniques, this tool is accessible for crafters of all levels. Here’s what you’ll need to get started.
GETTING STARTED WITH A CRAFTING BRAYER
At its core, the craft brayer is simple to use. To get started, you’ll want the following supplies:
- Stampin’ Brayer
- Cardstock
- Ink pads
- Embossing folders
- Stamps (Use a large background stamp for this.)
Once you have your basics, it’s time to get creative! Here are a few craft brayer techniques to try on your next project.
USING A CRAFTING BRAYER WITH EMBOSSING FOLDERS
A fantastic way to use the brayer tool is with embossing folders. To do this, place your paper between your embossing folder. Next, load the brayer with ink by rolling it over an ink pad. Then roll the brayer over the raised design of the embossing folder to ink the intricate details of the pattern onto your paper. It’s as easy as that! From backgrounds for handmade cards to scrapbook page borders, this simple brayer technique adds a stunning touch to any project!


USING A CRAFTING BRAYER WITH STAMPS
Stamping with a brayer is an easy way to ensure even coverage in your stamp designs. To try this craft brayer technique, grab some paper, your favorite stamp, and some ink, and you’re ready to go. Start with a clean stamp. Roll the brayer over an ink pad to load the tool with ink. Then roll the brayer over the stamp, ensuring that every nook and cranny gets inked up perfectly. Then stamp the ink onto your paper. There you have it! A beautifully stamped image that’s ready to take center stage on your cards, scrapbook pages, and more.


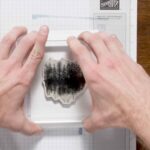
USING A CRAFTING BRAYER TO TRANSFORM PLAIN PAPER
Now, let’s explore a more advanced craft brayer technique. With the brayer’s smooth gliding action, you can create custom backgrounds, gradients, and textures that add depth and dimension to your projects. For this technique, you’ll need your brayer, some plain paper, and your favorite ink. After that, it’s up to your imagination to unlock a world of possibilities. You can use this freestyle technique to create elegant invitations, funky art, journal pages, and more!


Want to see these techniques in action? Check out the video below:

FAQs ABOUT HOW TO USE A CRAFTING BRAYER
If you’re new to using the crafting brayer or just want to get more out of this versatile crafting tool, you’re not alone! We’ve compiled a list of the most frequently asked questions to help you get started.
WHAT IS A CRAFTING BRAYER USED FOR IN CARD MAKING?
The crafting brayer unlocks a world of possibilities when it comes to making handmade cards. From custom backgrounds to perfect stamps, this tool makes it easy and fun to put ink to paper as you make uniquely personal cards for those you love.
CAN I USE A BRAYER WITH ALL TYPES OF INK?
Yes! The brayer tool works with all types of ink. While ink pads provide an easy surface to roll the brayer over, you can also use pigment inks and acrylic paints to achieve different effects. You’ll just want to make sure to match your ink or paint to the surface and effect you want.
HOW DO YOU CLEAN A CRAFTING BRAYER?
Always clean your brayer promptly so it doesn’t get sticky or stained. To do this, simply remove excess ink from the roller. The Simply Shammy works great for this. Then wash it with warm soapy water. Make sure to dry completely before storing.
WHAT KIND OF PAPER WORKS BEST WITH A BRAYER?
You can use all types of paper with your craft brayer. While cardstock provides a clean, smooth surface to work with, you can also get creative with textured and other specialty papers to achieve your own custom designs.
HOW DO I AVOID STREAKS OR UNEVEN COVERAGE WHEN USING A BRAYER?
There are a number of things you can do to avoid streaks and uneven coverage when using your crafting brayer. First, make sure you’re working on a smooth, even surface. Next, ensure that you are evenly applying ink to the brayer. Finally, try transferring ink with a light, consistent pressure and keep rolling and blending until you get the look you want.
IS A BRAYER BETTER THAN A SPONGE OR BLENDING BRUSH?
Just like a sponge or blending brush, the brayer is a great tool to have in your crafting repertoire. All of these tools can be used to apply ink, but each tool offers its own unique effect. For example, a sponge is great for dabbing and adding texture, a blending brush is perfect for building color gradually or creating subtle transitions, and a brayer is ideal for things like backgrounds and gradient effects.
GIVE THE CRAFTING BRAYER A ROLL
Whether you’ve used a brayer before or are exploring new crafting techniques, adding a crafting brayer to your toolbox can be a fun way to expand your abilities and unlock a world of possibilities. For more crafting tutorials and guides, visit the Stampin’ Up! YouTube channel. You can also get personalized instruction by connecting with a Stampin’ Up! Demonstrator near you.