
How to Make a Gift Bag Out of Paper with Just One Sheet of Cardstock


You’ve found the perfect gift for a friend, but figuring out how to wrap it? Not so easy. With one sheet of cardstock and a few simple folds, you can make a gift bag yourself—no store-bought bag required.
That’s exactly what Artisan Design Team member Michelle Pepper from Auckland, New Zealand, did. She created this surprisingly roomy DIY paper gift bag and finished it with paper flowers made with the Scalloped Blooms Dies.
It’s a great way to package small gifts like chocolates for a neighbor, a candle for a friend, or homemade cookies for someone you want to thank. And because you’re making the bag yourself, you can choose cardstock that fits the gift and the person receiving it.
Want to see how Michelle made hers? See the tutorial here.
How to Make a Gift Bag Out of Paper
With a few supplies and three easy steps, you can make your own gift bag and finish it with handmade paper flowers.
Supplies You’ll Need
- Cardstock
- Scalloped Blooms Dies
- Stampin’ Cut & Emboss Machine
- Paper trimmer with scoring tool
- Take Your Pick tool with stylus tip
- Ruler
- Silicone Craft Sheet
- Bone Folder
- Mini Glue Dots or Stampin’ SEAL+
- Stampin’ Spritzer (optional)
- Heat Tool (optional)
- Embellishments for the flower centers
1. Cut and Score the Cardstock

Start by cutting the cardstock to the dimensions shown above, then score along the indicated lines. For the diagonal score lines, use the stylus tip of the Take Your Pick tool with a ruler and Silicone Craft Sheet.
Using A4 cardstock? Start with a sheet measuring 8.27″ x 11.69″ (21 x 29.7 cm). After cutting the cardstock according to the image above, save the leftover strip for the bag handle. The handle strip should measure 5/8″ x 8-1/4″ (1.6 x 21 cm).
2. Fold and Assemble the Bag
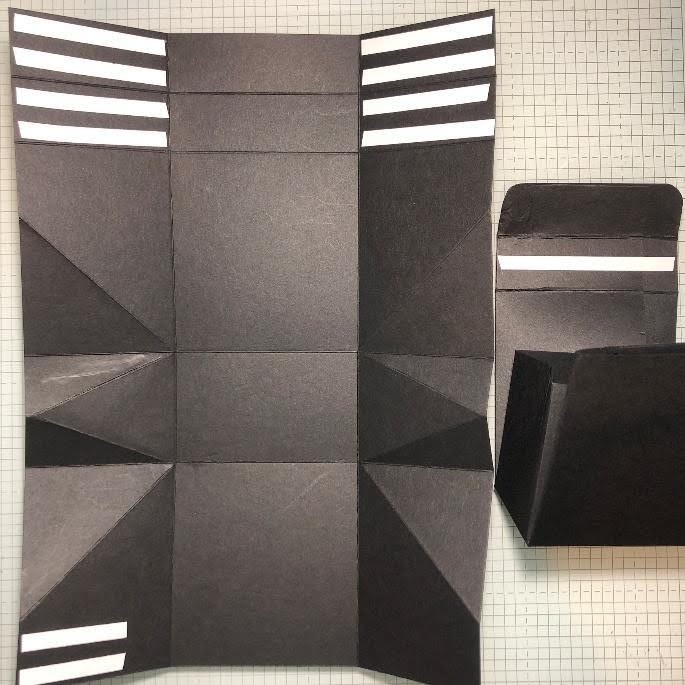
With the score lines in place, it’s time to give your bag some shape. Fold along each line and use a Bone Folder to create crisp folds. Add adhesive as shown in the image above, then assemble the bag.
Adhere the handle strip to the flap. Trim and taper the flap, then round the corners so it tucks neatly into the opening at the front of the bag. This creates a simple closure without the need for magnets or ribbons.
3. Make Paper Flowers

With the bag assembled, you’re ready to add the flowers. For each one, die cut six large scalloped circles and one or two smaller scalloped circles with the Scalloped Blooms Dies.
You can leave the scalloped circles smooth or give them a little texture using a Stampin’ Spritzer. To do this, make a small cut into each scallop as shown above. Lightly spritz the die cut pieces with water, then scrunch them. If they’re still damp, use a Heat Tool to dry them before adding adhesive.
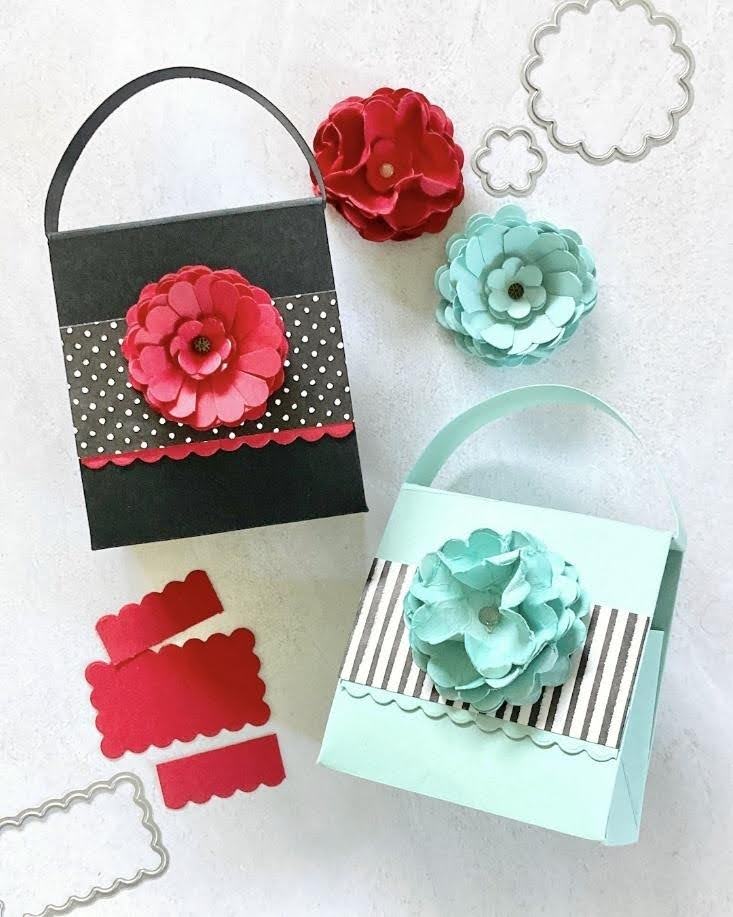
Layer the pieces with Stampin’ SEAL+, then add an embellishment to the flower center. To finish, die cut the scalloped rectangle as shown in the image above to create a decorative border.
A Little Something Extra for Your Gift
Who knew one sheet of cardstock could hold so much? Now you’ve got a simple way to make your own gift bag whenever you need one. Keep this tutorial handy for the next gift that needs wrapping.
Love the Scalloped Blooms Dies used in this project? The Scalloped Blooms Bundle also includes sentiment stamps for adding a personal message to your handmade gifts. Find it here.
